Bi-folding versus Sliding Doors

If you’re planning a home renovation project that requires large, glazed door solutions, you’ll most likely be making a decision between bi-folding and sliding doors. Both have grown phenomenally in popularity in recent years, and while they are similar in some respects, they have unique features that may affect their suitability for your home.

Bi-folding doors

Express-bifold-Folding
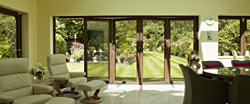
It goes without saying that bi-folds create a wow factor – when open, they completely transform the space, bringing the outdoors in. We recommend bi-folding doors for a size up to four metres; within this measurement, bifolds look much more impressive than sliding doors. A greater clear opening can also be achieved, creating more sociability between your indoor space and garden.

Express Bi-folding Doors wholeheartedly encourages bi-fold customers to opt for integral blinds, which are both stylish and functional. Big benefits include no cleaning or maintenance, as well as the blinds fitting perfectly into your bi-folding doors. Less bulk means more light, and that’s exactly what we want to achieve! On the flipside, however, you must remember that with a bi-folding installation comes extra framework, which some may want to avoid. That’s where sliding doors come in…

Sliding doors

Express-bifold-SlidingA more traditional option, sliding doors may be the perfect choice for you. They tend to look better when they’re closed, as the large panels of glass welcome light into the home without being broken up by framework. For installations over the four metre mark, they are the ultimate choice; the wider the door, the wider the clear opening.

Express Bi-folding Doors offers sliding doors with 2, 3, 4 or 6 panels, so you can select the most appropriate one for your home. And of course, as with bi-folds, they come with the same colour options and guarantee, so you can sure they fit into your home seamlessly as well as having peace of mind.


Busting myths about timber windows

It’s a common misconception that timber products are a more expensive option than alternatives like u-PVC. In fact, research shows that because of their longer service life, timber windows actually offer better long-term value than u-PVC. In this article, Tony Pell of JELD-WEN sheds lights on popular misconceptions about timber and advises on making the most of premium timber products.

According to the latest research by Heriot Watt University in Edinburgh, window frames made to Wood Window Alliance standards are likely to last, on average, around 60 years with the proper maintenance. They can also be repaired simply and inexpensively – when a fitting on a plastic window breaks, often the whole window is replaced. The Whole Life Cost study also suggested that other timber window types could also be the best option for high-rise buildings, in addition to properties exposed to extreme weather conditions.Timber cottage window

Another popular myth is that timber windows are harder to maintain than other products on the market but the growing trend for factory finished products means that the latest designs come pre-painted. This means that they are finished to such a high standard that the initial maintenance cycle can be extended by a further eight years or more and regular maintenance will further extend their lifespan. These windows can also be easily maintained with a rub down and a single coat of paint. Not only will these products actively save money over their lifetime, but timber windows will need replacing far less frequently than their alternatives.

It is often thought that plastic windows are a more energy efficient choice but this is purely myth. Timber is an excellent insulator and leading window manufacturers can supply a wide range of glazing and energy saving options, incorporating double or triple glazing that can vastly improve a property’s carbon footprint. In addition to thermal performance advantages, there are many security and acoustic benefits to choosing timber windows.

It’s also worth bearing in mind that most homes in the UK were built using wooden windows, so renovating with plastic or metal windows can vastly change a property’s appearance. Property experts suggest that this modernising actively devalues a property, so by upgrading to double-glazed, factory finished timber windows you can actually improve the value of a property while also preserving its character.

For more information about educating your customers on the merits of choosing timber windows for their renovation projects visit the JELD-WEN website

How to create a perfect garden room

An extra room looking on to the garden is a traditional choice for many UK homes, and whether it is a garden room, sunroom or conservatory, the variety available is vast. It’s certainly a great way to add value to your property; the one danger is it can end up looking like something bolted onto the side of the house, rather than an integrated part of the existing structure.

Neil Ginger, CEO at Origin, gives his top tips on how to avoid this, and ways to enhance the flow and overall size, whilst adding value.

What to Look For:

The debate over which material is best is seemingly never ending; we would always recommend an aluminium structure for the glass doors and windows as it is the strongest of the three acclaimed materials (timber, PVCu and aluminium). It’s strong and lightweight, so can support larger glass panels and allows for slimmer frames to let in more natural light. The colour will last too, unlike with PVCu, which can sometimes discolour. Timber will also need to be repainted over its lifetime. Aluminium, however, doesn’t discolour, rust or peel once powder coated, giving it a long-lasting attractive finish.

Origin garden room1Fit Bi-folding Doors

A key feature of bi-folding doors is that they will open up an entire wall – perfect for a garden room feel. When the doors are folded back it will provide flawless transition, as the aperture will be clear, bringing the outside space into the home seamlessly and transforming the property into a functional open space for living, working and entertaining. Roof lights are also a great way to increase the amount of natural daylight in a garden room, and often come hand-in-hand with bi-folding doors.

It Must Match:

The first design rule is to ensure the garden room matches the style of the rest of the house. Don’t make it seem as if it’s in any way separate. You can enhance the feeling of flow and space by installing similar flooring throughout your downstairs living area, leading the eye through so the garden room or conservatory feels part of the rest of the house. If you don’t want the expense of new flooring, increase the sense of continuity between rooms using soft furnishings such as matching blinds or curtains.

Origin bi fold doors openAdd Colour:

Power coated aluminium bi-folding doors come in an extensive range of colours making it easy for homeowners to blend the door frames with their existing colour scheme. Alternatively, you can add a splash of colour by choosing bi-folds in vibrant colours such as Orient Red, Mint Green or bright pink.

If the preference is for timber frames, which most homeowners seek when creating a garden room, the aluminium can be coloured to give a timber effect, giving all the natural beauty of timber, but without the maintenance hassle.

Hang Mirrors In The Wall:

A very easy and clever tip is to hang big mirrors on either side of the walls, reflecting into each other, to magically make the room feel bigger and increase the feel of natural sunlight, which is so important when creating a garden room.

Solar:

Keeping a garden room warm in winter and cool in summer is a priority for all year round use. Fitting high performance double glazed units with solar properties will provide a secure and thermally efficient ‘glasswall’ that will not impact on your energy bills. The industry standard for double glazing is 24mm and 28mm sealed units, both will help keep your home warm in winter and cool in summer.

Article by Neil Ginger of Origin Easifold Doors


Install a multi function kitchen for a truly Modern Makeover

In previous decades, the living room was the focal point of the family home. Adults and children would congregate there in the evening, watching television and socialising with friends. But times have changed and kitchens have replaced living rooms as the focal point of the modern home.

Perhaps influenced by American TV programmes, where the average room is a vast open space, a lot of families are opting for larger multi-functional kitchens where the family can gather in the evening and share food and conversation. Instead of a small, cramped kitchen and separate dining room, the two rooms are opened up to create a light, airy space. So if this type of kitchen appeals to you, how can you create your own multi-functional kitchen?

Bigger is Better
The key to a multi-functional American-style kitchen is space. There is nothing wrong with a small kitchen, but in order to turn the room into a family room, it needs to be large enough to cope with the addition of extra items of furniture. If possible, create an open plan kitchen-dining room, or, if your kitchen looks out on to the garden, replace a back door with French windows. You could even build a conservatory extension to create extra space if there is sufficient room.

Light and Bright
A modern kitchen should be light, bright and airy. There are lots of lighting options to choose from when redesigning an old kitchen. Ceiling spotlights can be fitted at the time of installation. These will give you plenty of light for preparing food. Under cupboard lights are a nice feature, particularly at night. You could even opt for low level lighting along the bottom of base units if you need a landing strip to guide you to the fridge at 4AM.

Pick the Right Units
There are dozens of modern kitchen units on offer these days. Solid wood units (oak and pine) are still popular, but if you want to create a modern look, check out the latest gloss styles in pale colours. Dark wood or wood effect is also back in vogue. Accessorise with black granite worktops, stainless steel appliances and a few splashes of colour, and you will end up with a modern, sexy kitchen.

Colour is the Key
For a light, bright modern look, go for light or dark units and add an injection of accent colour in your accessories. Glass splashbacks are a fantastic way of stamping your personality in a kitchen. Glass splashbacks are available in any colour under the sun, so if you have a passion for hot pink or startling magenta, pick a glass splashback to suit. Once you have established your main accent colour, co-ordinate blinds and other decorative features accordingly.

Extra Furniture
No American-style kitchen would be complete without a large wall mounted TV, a dining room table and a cosy couch where the family can chill out while you prepare the evening meal.
If you are stuck for inspiration, check out photos on Pinterest to give you a few ideas. Then you can start making plans to turn your boring old kitchen into a multi-functional dream space.

About the author:
This article was written by Ian Shaw from Morley Glass. Ian writes for a number of websites on the subjects of home improvement and glazing solutions. As you might expect, he has a special interest in glass, particularly coloured glass, which he has recently installed in his own kitchen

Fire Door Safety Week

We are now in Fire Door Safety Week 2013 (16 – 21 September) which aims to raise awareness of fire safety and the importance of recognising fire doors as a safety device. Fire doors are the ultimate life saver and in this article, I will explain how, as trade professionals, it’s crucial to install fire doors correctly to ensure their effectiveness.

Fire doors are specifically designed to save lives by reducing the rate at which fire spreads through a building, providing time for occupants to escape safely. So it’s essential to follow the manufacturer’s instructions to ensure that they fit properly and perform correctly in the event of a fire. They are available in a range of ratings that indicate how long the product can withstand heat and flames. The minimum rating is FD30 doors that protect life and offer 30 minutes fire resistance. Higher specification FD60 doors are also available, providing additional time and protection.

modern stylish fire door

Fire doors are fitted with an intumescent strip along the sides and top of the door or door frame, which lies dormant during everyday use, but rapidly expands when exposed to extreme heat to seal the gap between door and door frame. This barrier against fire explains why it is so important that a fire door is kept closed at all times, ensuring a clear route to safety in the event of a fire.

The latest regulations stipulate when a fire door should be installed so it’s important to keep updated on the latest changes. Be sure to check that the door installed has the correct certification for its intended use and it is installed, and maintained, by competent personnel. A fire door closer must remain connected at all times.

As fire doors are typically thicker than standard doors, trade professionals are often forced to replace both the door and the door frame, adding to the complexity and cost of the project. To combat this, JELD-WEN has developed an exclusive collection of FireGuard® FD30 doors that offer 30 minutes fire protection, but are within the standard 35mm thick door construction – so it’s simply a case of changing the doors using the existing frames and linings.

The FireGuard® range is also available in various designs, making fire safety practical, affordable and stylish.

It’s critical that fire doors, frames and components are purchased from certified companies and are rated by the British Woodworking Federation BWF-CERTIFIRE scheme, which demonstrates that the door specifications and manufacturing methods have been assessed rigorously and audited regularly to ensure compliance with the highest safety standards. Doors that reach this standard can be identified by the BWF-CERTIFIRE label on the top edge of the door and ironmongery components must hold a CE mark.

In most instances fire doors can be trimmed, but the amount can vary so check the instructions – it’s important not to trim the top of the door as the CERTIFIRE label must not be removed. It’s also essential that a fire door is not altered on site and never cut holes or glazing apertures into a fire door, unless certified to do so. Finally, it’s crucial to check that there is a consistent gap of between 3 and 4mm between the door and door frame and that any gaps around the outside of the frame are sealed with intumescent material to prevent the fire from rapidly spreading.

For more information and advice on fire doors, visit JELD-WEN’s website where you’ll also be able to access a ‘how to’ video on fitting a fire door correctly.

Article by Chris Miller, product manager at JELD-WEN

Save Money With A Green Bathroom

Going green is the morally right thing to do and, as it will often save you money, it is also the practical thing to do. While it may seem like you personally can’t do much to help the environment and prevent climate change, that’s far from the case. Indeed, this guide, produced by Splashdirect, is split into 3 sections to show YOU how YOU can make a real difference by doing very little with your bathroom.

Eco Living
Image courtesy of ponsulak/ FreeDigitalPhotos.net

1. Always Choose Recycled Products:
Worldwide 27,000 trees are cut down each day, solely for toilet paper. Choosing recycled toilet paper will drastically reduce this figure, so don’t be a prude: using recycled toilet paper isn’t disgusting, it makes sense.

Why stop there? Choose bathroom cabinets and countertops made from natural or sustainable resources, such as stone and glass.

2. Green Cleaning:
When the time comes to clean your bathroom, use non-toxic cleaning products as toxic ones are hazardous to both the environment and your health.

Rather than shelling out large amounts of money on cleaning products, consider creating your own from everyday household items. A simple solution of one quarter vinegar with three quarters water, for instance, will tackle stubborn grime and remove limescale from shower screens.

3. The Importance of Saving Water:
WaterAid reports that 768 million people don’t have access to clean water, resulting in the premature and unnecessary death of 2,000 children per day. With water being so precious, we should be doing everything we can to reduce the amount of waste.

Begin with Your Toilet:
With a family of four estimated to flush the toilet approximately 14 times per day, it is easy to see how the toilet accounts for 25% of all bathroom water usage. Your toilet should, therefore, only be reserved for flushing: NEVER be tempted to flush creepy crawlies or tissues.

To save water, upgrade to a dual flush toilet. With a dual flush toilet you have two types of flushes: a 3 litre one and a 6 litre one. The 3 litre flush will empty the cistern only halfway and is suitable for liquid waste, whereas the 6 litre flush will completely empty the cistern and will be ideal for solid waste. You don’t need to perform a complete flush each time you visit the toilet so this simple upgrade will easily help cut costs.

Use your Taps Wisely:
With the average leaking tap wasting 90 litres of water per week, and 4,680 litres per year, failure to fix a leaky tap is not only annoying but incredibly wasteful.

To save even more water, consider an aerated tap. These feature a filter which is able to mix the water with air to reduce the output without compromising on pressure.As your mother always said, “Never leave the tap running whilst brushing your teeth.” This is of the utmost importance because the average tap will release approximately 6 litres of water per minute. So if you brush your teeth for two minutes, twice a day, this will result in a waste of 24 litres per day.

Avoid Wasteful Baths:
Whilst you may be partial to your bath, showers use 40% less water, so it’s a no brainer: Always choose a shower instead of a bath.

It would, however, be unwise to completely ditch your bath because it is impossible to achieve the same state of relaxation and luxury which is synonymous with a bath; so reserve this purely for a treat.

As with taps, consider a water saving shower head which has an inbuilt aeration process. These will effectively inflate the water with air to create larger water droplets. The large droplets will provide the same water coverage, but can reduce the amount of water by up to 75%.

Paul Durkin is a full time blogger for Splashdirect where he aims to make life easier for the average person through a series of DIY tips and buyer’s guides.

Get warm with Insulation before the cold weather arrives

Saving money with insulationWith ever-soaring energy prices and constant reminders about the need to limit CO2 emissions, none of us one can afford to ignore the importance of insulation. New homes are built to high standards of insulation, but older properties will invariably benefit from work to prevent heat loss, leading to lower fuel bills. Continual product innovations mean it is probably worth considering an upgrade even if your home already has a certain amount of insulation. Summer is a good time to do the work.

Where to start? Heat rises, so the biggest loss of heat is often through the roof. For a building with a pitched roof over loft space, laying a thick blanket of glass fibre or mineral wool is the most effective way to insulate and costs can be recouped in lower energy bills within a year or two. Loose-fill material such as vermiculite is another option, but is not as popular because ideally it needs to be thicker than the depth of the joists – so tends to be used only in an awkwardly shaped loft.

Rolls or slabs of insulation material are generally 600mm wide to match standard joist spacing, so it is a fairly simple job, but it is important to wear gloves and long sleeves to prevent skin irritation and a mask to avoid breathing in fibres. Remember to leave the eaves clear for ventilation and to lift electrical cables over the insulation so they do not overheat. Tie insulation around water tanks in the loft but do not insulate underneath them. Wrap a wad of insulation in plastic and secure to the upperside of the loft hatch.

Once the work is done, all those Christmas decorations and other clutter stored in the attic will no longer be bathed in the heat that used to rise through the ceilings below, but the occupants of everywhere apart from the roof space will be a lot warmer!

Pipework is another major source of heat leakage and pipes are at risk of freezing in the roof space if left unlagged. Foam casings are available in various sizes and are easily fitted around pipes. Just join the pieces of foam with PVC tape. For neat joins at corners, cut the ends at 45° using a mitre board and then tape together. Another method of insulating pipes is to box them in using battens and plywood and pouring in loose-fill insulation material. This has the added advantage of concealing unsightly pipes and if the boxing is decorated it will be effectively disguised. Screw, rather than nail the boxing together so the pipework can still be accessed when necessary.

Walls account for a huge surface area in any home and can be the cause of up to 35% heat loss. Cavity wall insulation involves pumping mineral fibres, foam or pellets into the wall space and is a job for an approved contractor. The pay-back period is about five years. External insulation for solid walls is another area for the professionals, but competent DIYers can tackle the interior of solid walls. An economical solution is to dry-line walls with insulated gypsum board, fastened directly to the wall with panel adhesive or nailed to a supporting framework of treated wood strips. Ordinary plasterboard sheets can also be used, combined with insulation blanket and a vapour barrier.

Mark cutting lines on the dry lining board with a pencil before cutting with a fine-toothed saw, on the opposite side to the insulation. Use a padsaw to cut holes for light switches or socket boxes. When nailing the boards in place, hammer them so the nail heads just dimple the surface.

Floors and windows are other places where insulation and draughtproofing can make a big difference to energy bills and to the comfort of the building’s occupants. We’ll come back to those another day.

Seamless Extension Reveals Wonderful view of Garden

bring the outside insideThe Pollins family wanted to add an extra living space to their home and create a room that would remove the boundaries between inside and outside. The main objective was to provide an uninterrupted view of the garden which they could enjoy all year round; in effect the creation of what is now commonly known as the ‘third living space’.

Martin and Sue Pollins moved into their house in Newick five years ago. Although a relatively new build, the grounds originally belonged to an old nursing home, which meant that they inherited a 100-year-old yew hedge and beautiful silver birches encircling their south east facing garden.

The Pollins family knew from the outset that they didn’t just want to add an extra room to the house, they wanted a view. Their first thought was to put in a traditional conservatory, but felt a brick base would detract from what they wanted to achieve, a seamless link between the room and garden.

“It took several years to decide what we actually wanted. Finally when speaking to Lifestyle Conservatories, who were part of the design process from the start, Origin Bi-folding doors were recommended. Once we realised that bi-folds would create the conservatory we had in mind, with large glass expanses and modern architecture, we knew this was the modern chic look we wanted,” says Sue Pollins.

The Pollinses were impressed with the floor to ceiling construction of bi-folding doors and for them the key points – unspoiled design between the room and garden, the security features and the ease of use – proved to be the perfect combination for their ideal conservatory.

They specified a five-door and a three-door set for their 16 sq m conservatory, with all doors in both sets folding and sliding in the same direction. Incorporating two sets of folding sliding doors into the room design meant that the entire opening and wonderful view of their garden would be revealed.

The five-door set was fitted in an aperture of 5123mm with each door leaf measuring 989mm wide by a standard height of approximately 2351mm. The three-door set was installed into a 3050mm aperture with each door measuring approximately 966mm x 2351mm. The aluminium doors were powder coated in hipca white to maintain a modern fresh look, but also to match the french doors already installed in the house.

The high grade powder coated finish of the doors removes the need for periodic painting and maintenance. The hard wearing finish protects against scratches and colour fading, minimising the upkeep of the doors. Martin and Sue Pollins chose their specific opening configurations to ensure they had use of an everyday traffic door or master door, which when opened connects to a magnetic keep to prevent the door slamming shut. The main traffic door houses an eight-point multi-point locking system and satisfied concerns about security.

In terms of a conservatory extension ‘bringing the outside in’, the bi-folds give the home a super sleek structural integrity and the concertina effect of the doors creates an affinity between the house and garden.

home extensionConstructed to the highest standards, Origin Bi-fold doors combine not only elegance, but also the very latest in door security, with an eight-point multi-point locking system and magnum security cylinder which protects against all forms of physical attack. Manufactured and assembled at its High Wycombe factory, Origin’s eight point locking system conforms to police preferred ‘Secured by Design’ standards. Chamfered 20mm linear bolts give a smooth lock-engaging mechanism, as well as maximum compression for increased weather resistance. Add to this the deep throw 25mm security hooks – the deepest engagement – and the result is a lock which provides the best in security and weather proofing.

Internally the lantern roof creates a naturally bright, airy space giving a warm and therapeutic feel, so consequently the room has become a key feature of the house completely incorporating the garden.

When the doors were fitted in May 2012, marking an end to the project, Martin and Sue Pollins noticed a huge change in their day-to-day living. “We find ourselves sitting out here come rain or shine. When the doors are folded back it feels as if you are out in the garden, but we experience the comfort of being indoors. The whole process from beginning to end has been effortless – we have brought the garden into the house without having to move the earth,” concludes Martin Pollins.

TESTIMONIAL: “The doors are made to an exceptionally high standard; they fit perfectly, keep all the elements out, are incredibly secure and open with ease. Origin is to bi-fold what Apple is to computers” – Martin Pollins

Article by Neil Ginger: Origin Easifold Doors

How to choose and lay tiles

Grouting dark tilesTiles have been around for centuries but it’s fair to say that the choice of styles and designs has never been greater. A time-travelling Roman would still be able to find familiar mosaics incorporating stone and glass, but the majority of tiles used today owe their existence to the development of the ceramic tile industry in The Netherlands in the 17th century. With a resurgence in interest in authentic period details, Victorian tiled panels are in demand once more and friezes are appearing in courtyards.

To lay tiles on walls, ceramic and porcelain tiles reign supreme but glass and natural stone also have their place. Ceramic and porcelain floor tiles are widely available, but hardwearing natural stone tiles such as limestone, slate and travertine are frequently chosen for floors and are ideal for areas such as conservatories and orangeries. Even with stone, there is a surprisingly wide range of colours and effects. With ceramic and porcelain tiles, the sky’s the limit on choice of colour and finish – glossy, matt, sparkly, crinkled or smooth. For something really unique, there are hand-made and hand-painted tiles on offer.

So having chosen your style of tile and decided to tackle the job yourself, how do you lay tiles to achieve that perfect hard-wearing decorative finish on a wall or floor? As with so many DIY jobs, preparation and planning is the key to success.

Work out how many tiles you will need, by careful measuring of the wall or floor and calculating the number of rows of tiles in each direction. If tiles of different sizes are to be used and a pattern or border introduced, it will be easiest to set out the design on paper. Count any part tiles as a whole and whatever figure you arrive at, add at least 5% to allow for breakages or miscalculations. Some tile suppliers have estimation grids on their websites.

Prepare the wall or floor to make sure the surface is smooth, clean and dry. Modern adhesives allow new tiles to be laid on old, provided they are not loose, but if the wall is currently papered, this will have to be removed. Make sure there are no ‘nibs’ of wallpaper left. Painted walls will just need to be thoroughly cleaned. New plaster must be completely dry and might need a coat of primer.

It is possible to lay tiles straight onto concrete floors as long as they are level, dry and free of dust. With floorboards, a layer of plywood will need to be fixed on top before tiling commences. And remember that not all suspended wooden floors can bear the considerable weight of ceramic or stone tiles.

Essential tools are a notched trowel for spreading adhesive, a tile cutter, grout float and spirit level. Nippers for trimming edges are also useful and safety goggles to protect eyes. Different types of adhesive and grout are available depending on the type of tiles, the surface they are being fixed to and how much water they will be encountering. Manufacturers provide detailed explanations of suitability.

Decorative wall tilesAn important part of the planning stage is working out the starting point and order of tiling to minimise the number of tiles that need to be cut and avoid having very thin slivers of tile. Obstacles such as window reveals and door openings often mean that the centre point is different to where it would be on a plain, uninterrupted wall. Mark the starting line and nail battens to the wall as support strips.

Check, check and check again with a spirit level. A row of tiles that are not horizontal will cause untold problems. Setting out floor tiles is easier as they can be dry laid on the surface and moved around to find the best arrangement. Try to avoid having a lot of cut tiles where the eye falls as you enter the room. When it comes to the actual fixing of the tiles, don’t get caught out like in the old comedy films. It might be stating the obvious, but make sure you work back to an exit and don’t get trapped in a corner!

Apply the adhesive evenly using a trowel or spreader. The notches produce ridges that help to create an equal amount of adhesive under each tile so that they sit level. Only cover about 1m² of the wall or floor with adhesive at a time, so that you can lay tiles before the adhesive starts to dry. Some tiles have built-in spacers but others will need to be separated by small plastic spacers that are removed once the tiles have set. Spacers ensure a uniform distance between each tile giving aesthetically pleasing grouting. Wipe away any excess adhesive that squeezes out as more tiles are placed and keep using the spirit levels as you add more rows.

Once the adhesive has set, the tiled area should be grouted. Grout is now available in several colours so you can choose whether you want it to blend with the tiles or go for dramatic effects with a contrast colour. Use the float in long, diagonal strokes and make sure the joints are firmly filled. Compressing the grout with a blunt tool gives a professional finish. Frequently wipe the surface with a damp sponge as dried-on grout is very difficult to remove. Allow the grout to dry, then polish with a soft cloth. Stand back and admire your handiwork!

Making the most out of your Bifolds

Bi-folding doors can bring a modern look to any home, providing a spacious living area and transforming the look and feel of a room by letting extra light in. Natural light and the integration of garden and home, effectively known as the ‘third-space’, has become very important not only to homeowners, but also for house hunters as bifolds add the a real ‘wow factor’ to any home.

rear extension to houseAluminium is the recommended material of choice due to precision design and engineering required for bifolds, making timber and UPVC unsuitable materials for maintaining alignment over the lifetime of the product. Origin has been recommending aluminium bifolds for over 10 years due to its strength and durability, which allows for narrow, more aesthetically pleasing frames.

More than just black, white or grey! Bifolds now come in a range of colours from bright primary shades to candy pastels and deeper earthy tones – designed to give people the opportunity to express their creativity and individuality through their choice of door colour. In addition, the interior and exterior door frames can be in opposing colours, enabling the outside of the doors to match the external fixtures and fittings of the house, with the interior frame in a different colour to match the room.

Origin doors are available in a huge range of configurations, ranging from two-door options right through to large eight-door configurations that can open up the side of a house. Corner and bay window style configurations also allow the whole corner of a home to be opened up offering unrestricted vision and maximising access in and out of the property.

Bespoke electric blinds will add the perfect finishing touch, available in a wide selection of colours; they provide shade from the sun and privacy at night, as well as that sought-after designer look. The possibilities are endless.

Article by Neil Ginger, CEO Origin Easifold Doors.